M
Meowanator
Guest
GM Version: 1.4.9999
Target Platform: All
Download: N/A
Links: N/A
Summary
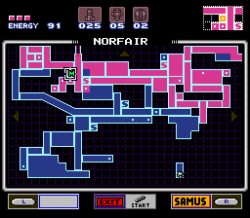
In games such as the Metroid series, there is a simple map system based around small boxes. Once you enter the room, the box fills in. This tutorial will show you how to make the boxes fill in along with custom colors for each room.

^The map that we will be making^

^The map in Super Metroid, where pink squares are explored and blue squares are not.^
^A video of the final map^
Part 1: Map Sprites
To have the image in the background, we just make a simple map sprite. I made the final map in full color and the background map you see by default a gray scale version. You can have transparent backgrounds if you wish for the map. The actual map is 15x13 pixels, key focus on being 1 pixel per box.


We also need to create a basic 1x1 sprite that is completely white. This will be the sprite used for the colors. The map name is spr_map and the 1x1 sprite is named spr_map_box. Make sure spr_map is centered.
Part 2: Initializing the Map
Create an object named obj_map_ui. The object has to be persistent with no sprite and have only 1 of in a loading room. (NOT 1 FOR EACH ROOM!) Put in the create event the following code:
This seems complicated at first, but all this does is intialize a 2d array of the coordinates. The z<=13 and i<=11 are how many pixels wide and tall your map is, not including an outline. We set all the map coordinates to undefined to not draw any color by default.
Part 3: Setting Up Draw GUI
In order to draw the map colors, we have to loop through each coordinate to make sure there is a color defined at the coordinate. In the Draw GUI event of obj_map_ui put:
For instance, if we had
then we would draw a blue color at 6,2 on the map. We will be defining the colors in the next part.
Part 4: Adding Colors!
A very important part of the way this works is by adding colors through the room creation code. In your rooms, put the following Creation Code:
This is an example of the room at 6,2 with a light blue box. Another example is
This would draw a faded red/pink color at 6,3 on the map. You can change the make_colour_rgb to a default color if you wish.
Part 5: Congratulations!
Good job, you finished drawing a simple room based map system! There are ways to expand on this system, but this should lay down the foundations for your game.
Target Platform: All
Download: N/A
Links: N/A
Summary
In games such as the Metroid series, there is a simple map system based around small boxes. Once you enter the room, the box fills in. This tutorial will show you how to make the boxes fill in along with custom colors for each room.

^The map that we will be making^

^The map in Super Metroid, where pink squares are explored and blue squares are not.^
Part 1: Map Sprites
To have the image in the background, we just make a simple map sprite. I made the final map in full color and the background map you see by default a gray scale version. You can have transparent backgrounds if you wish for the map. The actual map is 15x13 pixels, key focus on being 1 pixel per box.


We also need to create a basic 1x1 sprite that is completely white. This will be the sprite used for the colors. The map name is spr_map and the 1x1 sprite is named spr_map_box. Make sure spr_map is centered.
Part 2: Initializing the Map
Create an object named obj_map_ui. The object has to be persistent with no sprite and have only 1 of in a loading room. (NOT 1 FOR EACH ROOM!) Put in the create event the following code:
Code:
scale = 16;

for(z=0;z<=13;z++){
  for(i=0;i<=11;i++)
   {
     mapCoords[z,i]=undefined;
   }
}Part 3: Setting Up Draw GUI
In order to draw the map colors, we have to loop through each coordinate to make sure there is a color defined at the coordinate. In the Draw GUI event of obj_map_ui put:
Code:
///Drawing the map
if keyboard_check(vk_tab){

//Colors
for(z=0;z<=13;z++){
  for(i=0;i<=11;i++)
   {
     if (mapCoords[z,i]!=undefined)
      {
          draw_sprite_ext(spr_map_box,0,view_wview[0]*.5+((z*scale)-6*scale),view_hview[0]*.5+((i*scale)-5*scale),scale,scale,0,mapCoords[z,i],.7);
      }
   }
}

//Background map
draw_sprite_ext(spr_map,0,view_wview[0]*.5,view_hview[0]*.5,scale,scale,0,image_blend,.7);

}
Code:
mapCoords[6,2]=make_colour_rgb(0,0,64);Part 4: Adding Colors!
A very important part of the way this works is by adding colors through the room creation code. In your rooms, put the following Creation Code:
Code:
obj_map_ui.mapCoords[5,2]=make_colour_rgb(67,67,131);
Code:
obj_map_ui.mapCoords[6,3]=make_colour_rgb(209,91,118);Part 5: Congratulations!
Good job, you finished drawing a simple room based map system! There are ways to expand on this system, but this should lay down the foundations for your game.
Attachments
-
70 bytes Views: 13
-
70 bytes Views: 11


