
Q
Quackertree
Guest
GM Version: GM:S 1.4 (and up, probably)
Target Platform: Windows (although other platforms CAN be supported - Read more down below)
Download: https://github.com/Quackertree/depthShadow
Links: N/A
Summary:
A shader made by Xor for 3D which creates ortho-projected real-time shadows in your 3D games - Explained, documented and open-sourced for you to use in your projects.
This is an intermediate tutorial, although I try to explain most of the process.
The full code can be viewed on GitHub. I'll place a couple of snippets here for reference.
Tutorial:
Hi there!
I wanted to make this tutorial for a bit now, but I kept forgetting I was going to, so this comes out a little late (especially with the new release of GM:S 2). Either way; Some of you may already have seen my game. I've been using 3D shadow in there, but there was a problem with the original method of shadow projection, where the shadows fall off the farther you move away. This caused the game to look ugly, etc.
In order to solve these issues, Xor helped me out and wrote an awesome shadow shader which projects them orthogonally onto the models. This means, that the shadows will always stay consistent in width, and the position of the camera now no longer has an effect on the shadows. I eventually re-wrote the shader slightly in order to add some extra post-processing effects to it.
The result looked somewhat like this (note: There are more shaders active than just the shadow shader):

I've got a couple of questions now on whether I wanted to do a tutorial on how I got to these shaders. So, let's get going!
How it works:
Here's a poorly drawn image of a side-view representation of a 3D space. I'll use this to explain how the shader (basically) works:

In the real world, we have a sun. The sun will cast rays of light and the rays of light which hit an object, will reflect. This leaves the parts behind the object with the ray hit to be dark, as they receive no light.
When we create a shader, we want to re-create this effect from real-life. We do this as follows:
When we compare the depth map to the pixels as we draw them, we can calculate the distance between the current pixel and the sun aswell. Now, we can test these against each other to see which one is smaller.
In the image above: The most upper ray consists of two parts; Black and red. The black part is the shortest distance until the ray hits something -> This would be saved in the depth map. The black + red part is the distance of the ray we're casting from the sun to the current pixel. This means, that the red part is the difference between the two distances.
Because there is a red part (because the distance from the current pixel to the sun is greater than the value in the depth map), the current pixel has to be shaded (since it is obstructed by other stuff in front of it).
It's a little hard of a concept to get around the first time - But once you get more into it, you'll start to understand what's going on.
Perspective vs. orthogonal
Whenever you create a regular d3d_projection in GM:S, you'll always get a perspective projection. This causes issues with the shadows, as the shadows widen the further away they get from the source. This is by definition what perspective does - Things will fall off the further away they get from the source.
This works fine for small points lights, however, when we're discussing such things as the sun, this doesn't apply. Because the sun is at such a large distance away from earth, we can state that the rays of light coming from the sun are almost parellel to each other, as demonstrated below:
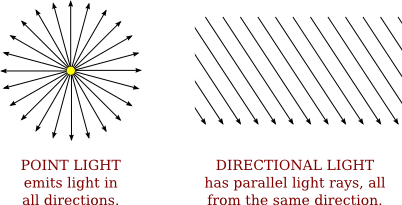
We call this, a "directional light".
In order to achieve this effect, we need to look through our world with an orthogonal projection. This is the exact opposite of perspective - Things don't widen the further away they get from the source. Instead, they remain the same size. This allows you to, in theory, look infinitely far away.
What we want to achieve
We want to achieve the following steps in our shader:
The shader
The first step, is to create the depth map. For this, we'll need an orthogonal projection. The following snippet of code is what we'll use here:
The above bit of code will setup an orthogonal projection, then read it's matrix, adjust it a bit and finally, return it. This code is under "xl_project_ortho.gml".
What we'll do, is take this matrix, pass it into the depth shader and use it to override the current projection matrix, effectively "tricking" the shader into thinking it works in a orthogonal projection and render everything that way.
I won't go over a lot of the setup stuff, you can read all of that under "xl_create.gml", which is a bundled script, with all scripts required inside it.
---
Now we have the matrix, we can start using the shader. First, we render by using the sh_depth_ortho. This is the important bit:
Note, that there are 3 different outputs. We call these MRTs (Multiple Render Targets) and they are something amazing included in Windows-only. It allows this shader to generate both the Diffuse, Depthmap and Normal in one render - This means you won't have to render loads of times which speeds up the render process a lot!
Note, that the shader doesn't use all 3 of these outputs. It just uses one of them. The shader still contains them, however, in case you may want to use these in the future.
What the code above does, in short, is convert the distance between the camera (temporarily located at the sun) and the current vertex, into a colour. Then, it saves this colour onto a surface.
Finally, the sh_shadow_ortho shader will render both the diffuse, aswell as the shadows (based on the depth map) onto two surfaces (once again, by using MRTs).
---
When you move your light source far away from the world, you'll get artifacts. This happens, because the depth map isn't precise enough. Shamefully, we cannot use the alpha component in the surfaces to extend the reach of the depth map (we've tried; GM didn't like it... :/). Therefore, we have to do clever trickery to get around this.
I resolved my issues by doing a post-process radial blur on the shadow surface. The code for this blur is as follows:
My blur size was set to 3 - This seems to be a good balance between quality and speed.
How to use the shader
Now you (sort of) know how it works, here's how you use the scripts from Git:
Make sure to add the files to your project and mark all shaders as HLSL 9, EXCEPT for sh_shadow_pp.
Above is a snippet of pseudo-ish code (with some copy-paste bits), which gives the general idea of how to work with this shader. It is a quite advanced one to get working, but once you do, it's pretty awesome!
Cross-platform issues
There's an issue when trying to use this cross-platform, as there are MRTs involved. However, you can adjust the shader to become GLSL only.
Personally, I really like the MRTs, because I also use them to setup my bloom. The SSAO shader from MishMash and orange451 that I'm also using also uses MRTs and they nicely combine together by doing so. You're free to convert, however.
I cannot say anything about performance on other platforms, although I can predict that it won't run amazingly fast on Android.
This code in GM:S 2.0
GM:S 2 has many new features, including cameras, which make this process a lot "easier". You'd not have to setup the entire "hack", which grabs the orthogonal projection matrix and passes it to a shader. Instead, you can now actually create an orthogonal projection by using cameras.
Most of the code still holds. I personally don't use GM:S 2.0, so I'm not going to convert the shaders anytime soon to work in that engine. Feel free to use try this out yourself if you so desire - It'll teach you a lot about shaders!")
Conclusion
This was quite the tutorial. If you still feel confused, don't use the shader, but read more about how it works. I've linked some other tutorials down below, which explain the process nicely in more detail. Once you have a proper understanding of how everything works, you'll be able to implement it into your games.
http://www.opengl-tutorial.org/intermediate-tutorials/tutorial-16-shadow-mapping/ (Great source, if you ignore the code snippets used here!)
http://ogldev.atspace.co.uk/www/tutorial23/tutorial23.html (Another great source for shadow mapping, if you ignore the code snippets!)
Hopefully you've found this tutorial useful! Let me know if you've got any questions down below, I'll try to answer them as best as I can.
Target Platform: Windows (although other platforms CAN be supported - Read more down below)
Download: https://github.com/Quackertree/depthShadow
Links: N/A
Summary:
A shader made by Xor for 3D which creates ortho-projected real-time shadows in your 3D games - Explained, documented and open-sourced for you to use in your projects.
This is an intermediate tutorial, although I try to explain most of the process.
The full code can be viewed on GitHub. I'll place a couple of snippets here for reference.
Tutorial:
Hi there!
I wanted to make this tutorial for a bit now, but I kept forgetting I was going to, so this comes out a little late (especially with the new release of GM:S 2). Either way; Some of you may already have seen my game. I've been using 3D shadow in there, but there was a problem with the original method of shadow projection, where the shadows fall off the farther you move away. This caused the game to look ugly, etc.
In order to solve these issues, Xor helped me out and wrote an awesome shadow shader which projects them orthogonally onto the models. This means, that the shadows will always stay consistent in width, and the position of the camera now no longer has an effect on the shadows. I eventually re-wrote the shader slightly in order to add some extra post-processing effects to it.
The result looked somewhat like this (note: There are more shaders active than just the shadow shader):
I've got a couple of questions now on whether I wanted to do a tutorial on how I got to these shaders. So, let's get going!
How it works:
Here's a poorly drawn image of a side-view representation of a 3D space. I'll use this to explain how the shader (basically) works:
In the real world, we have a sun. The sun will cast rays of light and the rays of light which hit an object, will reflect. This leaves the parts behind the object with the ray hit to be dark, as they receive no light.
When we create a shader, we want to re-create this effect from real-life. We do this as follows:
- We construct a so-called "depth map"
- We check if the depth map value, is smaller than the distance between the pixel and the camera. If this is true, that pixel will be shaded.
When we compare the depth map to the pixels as we draw them, we can calculate the distance between the current pixel and the sun aswell. Now, we can test these against each other to see which one is smaller.
In the image above: The most upper ray consists of two parts; Black and red. The black part is the shortest distance until the ray hits something -> This would be saved in the depth map. The black + red part is the distance of the ray we're casting from the sun to the current pixel. This means, that the red part is the difference between the two distances.
Because there is a red part (because the distance from the current pixel to the sun is greater than the value in the depth map), the current pixel has to be shaded (since it is obstructed by other stuff in front of it).
It's a little hard of a concept to get around the first time - But once you get more into it, you'll start to understand what's going on.
Perspective vs. orthogonal
Whenever you create a regular d3d_projection in GM:S, you'll always get a perspective projection. This causes issues with the shadows, as the shadows widen the further away they get from the source. This is by definition what perspective does - Things will fall off the further away they get from the source.
This works fine for small points lights, however, when we're discussing such things as the sun, this doesn't apply. Because the sun is at such a large distance away from earth, we can state that the rays of light coming from the sun are almost parellel to each other, as demonstrated below:
We call this, a "directional light".
In order to achieve this effect, we need to look through our world with an orthogonal projection. This is the exact opposite of perspective - Things don't widen the further away they get from the source. Instead, they remain the same size. This allows you to, in theory, look infinitely far away.
What we want to achieve
We want to achieve the following steps in our shader:
- Create an orthogonal projection and render an orthogonal depth map
- Use a second shadow shader to read out the shadows from the shadow map and render the final result on screen
The shader
The first step, is to create the depth map. For this, we'll need an orthogonal projection. The following snippet of code is what we'll use here:
Code:
d3d_set_projection_ortho( argument0, argument1, argument2, argument3, 0 );
var finalMatrix = matrix_get( matrix_projection);
finalMatrix[10] = -2/(argument5-argument4);
finalMatrix[14] = -((argument5+argument4)/(argument5-argument4));

return finalMatrix;What we'll do, is take this matrix, pass it into the depth shader and use it to override the current projection matrix, effectively "tricking" the shader into thinking it works in a orthogonal projection and render everything that way.
I won't go over a lot of the setup stuff, you can read all of that under "xl_create.gml", which is a bundled script, with all scripts required inside it.
---
Now we have the matrix, we can start using the shader. First, we render by using the sh_depth_ortho. This is the important bit:
Code:
float3 ftov(float f)
{
    return float3(floor(f/255.0)/255.0,frac(f/255.0),frac(f));
}
void main(in v2p IN, out p2s OUT)
{
    float4 col = tex2D(gm_BaseTexture, IN.Texcoord);
    OUT.Diffuse = col;
    OUT.Depthmap = float4(ftov(IN.Depth*65025.0),col.a);
    OUT.Normal =  float4(normalize(IN.Normal)*0.5+0.5,1.0);
}
Note, that the shader doesn't use all 3 of these outputs. It just uses one of them. The shader still contains them, however, in case you may want to use these in the future.
What the code above does, in short, is convert the distance between the camera (temporarily located at the sun) and the current vertex, into a colour. Then, it saves this colour onto a surface.
Finally, the sh_shadow_ortho shader will render both the diffuse, aswell as the shadows (based on the depth map) onto two surfaces (once again, by using MRTs).
---
When you move your light source far away from the world, you'll get artifacts. This happens, because the depth map isn't precise enough. Shamefully, we cannot use the alpha component in the surfaces to extend the reach of the depth map (we've tried; GM didn't like it... :/). Therefore, we have to do clever trickery to get around this.
I resolved my issues by doing a post-process radial blur on the shadow surface. The code for this blur is as follows:
Code:
void main()
{
   float result = 0.0;
   vec2 hlim = vec2(float(-uBlurSize) * 0.5 + 0.5);
   for(int i=0;i<uBlurSize;++i)
   {
      for(int j=0;j<uBlurSize;++j)
      {
         vec2 offset = (hlim + vec2(float(i), float(j))) * texSize;
         result += texture2D(shadowTex, v_vTexcoord + offset).r;
      }
   }

   vec4 texel = texture2D(gm_BaseTexture, v_vTexcoord);
   gl_FragColor = vec4(texel.rgb * (result / float(uBlurSize * uBlurSize)), texel.a);
}How to use the shader
Now you (sort of) know how it works, here's how you use the scripts from Git:
Make sure to add the files to your project and mark all shaders as HLSL 9, EXCEPT for sh_shadow_pp.
Code:
#Create
xl_create(); //Sets up the files -> Run this once in some Create event (anywhere, really)

#Draw
xl_depth(<Fill in appropriate parameters here>);
//Draw all your shizz
xl_depth_end();

if(!surface_exists(diffuseSurf)){/*Create...*/}
if(!surface_exists(shadowSurf)){/*Create...*/}

surface_set_target_ext(0, diffuseSurf); //Sets up for MRTs
surface_set_target_ext(1, shadowSurf); //Sets up for MRTs

xl_shadow();
//Draw all your shizz (again)
xl_shadow_end();

#Draw GUI Begin
shader_set(sh_shadow_pp);
texture_set_stage(shader_get_sampler_index(sh_shadow_pp, "shadowTex"), surface_get_texture(shadowSurf));
draw_surface(0, 0, diffuseSurf); //Cannot be application_surface
shader_reset();Cross-platform issues
There's an issue when trying to use this cross-platform, as there are MRTs involved. However, you can adjust the shader to become GLSL only.
Personally, I really like the MRTs, because I also use them to setup my bloom. The SSAO shader from MishMash and orange451 that I'm also using also uses MRTs and they nicely combine together by doing so. You're free to convert, however.
I cannot say anything about performance on other platforms, although I can predict that it won't run amazingly fast on Android.
This code in GM:S 2.0
GM:S 2 has many new features, including cameras, which make this process a lot "easier". You'd not have to setup the entire "hack", which grabs the orthogonal projection matrix and passes it to a shader. Instead, you can now actually create an orthogonal projection by using cameras.
Most of the code still holds. I personally don't use GM:S 2.0, so I'm not going to convert the shaders anytime soon to work in that engine. Feel free to use try this out yourself if you so desire - It'll teach you a lot about shaders!
Conclusion
This was quite the tutorial. If you still feel confused, don't use the shader, but read more about how it works. I've linked some other tutorials down below, which explain the process nicely in more detail. Once you have a proper understanding of how everything works, you'll be able to implement it into your games.
http://www.opengl-tutorial.org/intermediate-tutorials/tutorial-16-shadow-mapping/ (Great source, if you ignore the code snippets used here!)
http://ogldev.atspace.co.uk/www/tutorial23/tutorial23.html (Another great source for shadow mapping, if you ignore the code snippets!)
Hopefully you've found this tutorial useful! Let me know if you've got any questions down below, I'll try to answer them as best as I can.
Last edited by a moderator: